Wednesday, August 29, 2012

August 2012 Haul Video

Oh my word everyone. I made my first haul video. I just love watching other people's haul videos, because I'm always inspired by what others purchase. It's a way to see the latest and the greatest in crafting supplies. And if I like what they bought, I stay tuned to see what they created with it.

So anyways, here's my first haul video. All supplies, paper, embellishments, and such were all purchased from my favorite online craft store Shop Pumpkin Spice.


Hope you enjoyed my haul. Come back to see all the great things I've made with all my goodies.


Tuesday, August 28, 2012

Make It Monday #80

Hello dear friends.

This week at the PTI blog, the MIM challenge is "Making Garland". What a great challenge for us paper crafters - using garland in a project. Click here to see the video tutorial.

This is my take on the challenge. Instead of using a garland on a card, I created 5 garlands and strung them together to create a paper wind chime. I just loved using the butterfly dies for this project - don't they look like they are flying??


To put everything together, I cut out a doily die and strung the twine garland through the outer cut holes. Then I strung twine around the bottom of the doily and through the top and tied the twine together. I cut out some leaf dies to cover the top twine.


I hope you liked my paper butterfly wind chime. It was really fun to make. My daughter has already claimed it for her room. Ha. 


Monday, August 27, 2012

"Happy Day" Kraft Card

Happy Monday crafty friends. It's my turn to post on the Pumpkin Spice Blog.

This is my latest, quick and easy insta-card. I used the amazing "Happy Day" 6x6 paper pad from Simple Stories to create this 5x5 card. The card base is made of Kraft cardstock. Then I applied 4 strips of washi tape across for some added background. I cut the balloon paper with a postage stamp die and matted it with red cardstock. The best part of the card is the "Happy Birthday" sentiment. This 6x6 paper pad is FULL of sentiments and images you can cut out and layer. So fabulous!!


Supplies:

 Happy Day Paper Pad 6"X6"
Simple Stories "Happy Day" 6x6 paper pad
found here for $4.19

 Bazill KRAFT CARDSTOCK 8.5"X11
Bazill "Kraft" cardstock
found here for $0.28

 GINGER - “Pictures” Decorative Tape
MME "Indie Chic" Ginger washi tape
found here for $6.99

 All Is Bright: Faceted Rhinestones
MME "All is Bright" rhinestones
found here for $2.79

 All Spellbinders
Spellbinders "Nestabilities" Postage Stamp die
found here for special order

I'm just thrilled with this paper! I think I'm gonna make a mass amount of birthday tags and cards just to keep on hand. Perfect for a girl or boy or a lady or man. Love it!

Have a great week everyone. Be sure to stop back on Wednesday to check out my haul video. It's quite the crafting splurge.


Sunday, August 26, 2012

Make It Monday Challenge #79

This weeks MIM challenge at Papertrey Ink was "Fabric Die Cuts". Click here to see the video tutorial.

I was very inspired by this technique. I have seen a lot of die cut fabric and always thought it was neat but never tried it. With this technique, first you apply the fabric to cardstock by using spray adhesive. Brilliant!! This makes the fabric stiffer and easier to work with and adhere to a project.

Here is the card I made using this technique.


The frames around each sentiment are die cut using a "Framed Out" die. Sentiments are also from a variety of "Framed Out" stamp sets.
 

Sunday, August 19, 2012

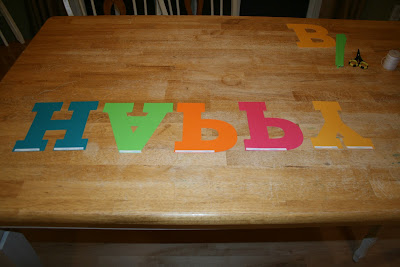
"Happy Birthday" Banner

I created this very simple banner for my niece's birthday party. Her theme was Luau so the colors needed to be bright!

First I cut out the letters from the Birthday Bash Cricut Cartridge at 7 inches.

After lining the letters up I flipped them over. Now I am certain the spell it right and not have any letters backwards. 
 I put some 1/4 inch scor tape on the top backside of each letter. 

I ran some twine between the letters, making sure the spacing was even. I then put some green paper over the scor tape to seal in the twine. 

The trick is to use a roller and really seal the paper around the twine. 
Don't I have the best little helpers. 

Flip the banners over.
All done and ready to hang!

My sister hung the banner on her kitchen window are the party. It looked really cute.


Thursday, August 16, 2012

Paper Fridge Frame

Good day my crafty friends. I created a Paper Fridge Frame to show you today.

If you've been following me for awhile you know I love making these frames. They are such fun to make! And they really are an insta-gift for anyone. I created this frame for my cousin who just had her first son.


Below is a two part video (Sorry - I meant it to be one video. Still learning about videos!) showing how I created this frame.

Part 1

Part 2

Supplies:

 Echo Park "A Boy's Life" - Teal/Yellow

 Echo Park "A Boy's Life" - Suave

Echo Park "A Boy's Life" cardstock
found here for $0.55

 Echo Park "A Boy's Life" - Element Stickers

Echo Park "A Boy's Life" Element Stickers
found here for $2.09

 CITRON - “Grow” Brads

My Mind's Eye "Indie Chic" brads
found here for $4.19

Cricut Cartridge "Lacy Labels"
Terrifically Tacky Tape
acitate
magnetic strips

Hope you'll liked my video tutorials! And I hope my cousin likes her little boy fridge frame.


Monday, August 13, 2012

Make It Monday Challenge #78

Hey everyone. It's Monday and I already completed my project for the MIM PTI challenge. What's a procrastinator supposed to do now? I'm never early for a challenge. Hehe.

This Monday's challenge is "Stamping and Stitching on Die Cuts". I just love how Heather Nichols makes everything look so easy. And so beautiful! Click here to see the video tutorial.

Here is my take on the challenge.


I used the leaves and dot from Rosie Posie. I stamped the leaves in Pure Poppy, Summer Sunrise, and Orange Zest. First I stamped the leaf in a light color and then ran the edge of the leaf around the ink pad in a darker color. I love using this technique to give texture to any stamp.

What makes the stitching technique so easy on this card is the dot detail in the leaves. I just poked my holes in every other dot. So slick! 


"Be Amazing" Butterfly Card

Happy Monday everyone. I had a blast this weekend. I spent Saturday and Sunday with my extended family. Sometimes my weekends are full of these people, and I love it. I am truly blessed with my family.

It is my turn to post for the Pumpkin Spice Blog.

I chose to use this beautiful My Mind's Eye paper. I love using the 6x6 paper pads for cards. The prints are smaller, so it fits perfect and looks amazing. This particular paper pad is GORGEOUS! It has some beautiful sentiments too. I just trimmed the background paper to a standard A2 size, and the sentiment fit perfect in the corner. No stamp needed!


Supplies:

 MME -Follow Your Heart Collection - Be Amazing - 6 x 6 Paper Pad
 MME : Follow Your Heart "Be Amazing"
6x6 paper pad
found here for $4.19

 My Mind's Eye - "Lost & Found Two" - Sunshine - "Sunshine"  Brad
 MME : Lost and Found Two "Sunshine"
Brads found here for $4.19

 Bazill KRAFT CARDSTOCK 8.5"X11
 Bazill Kraft Cardstock
found here for $0.28 

Distress Ink
various butterfly dies

Don't forget to buy the August Card kit Summer Blast. It is full of amazing embellishments, including washi tape, twine, and garland. Not to mention it comes with 42 sheets of 6x6 cardstock. All for the super low price of $19.95. What a deal!! My kit is being shipped to me as you read. I can't wait to get my hands on it.


Saturday, August 11, 2012

Make It Monday Challenge #77

Happy Saturday everyone. It's finally cooled off a bit around here. The sun is still shining bright and the kiddos are running crazy in the backyard. Isn't this the summer weather we've been waiting for!

This week's Make It Monday Challenge at the Papertrey Ink blog is a technique called "Ink Pads as Watercolors". Dawn shows us an amazing way to use ink as a free form paint. I'm in awe of her talents! Click here to see the video tutorial.

This card is my take on the challenge. All supplies used are from Papertrey Ink except the liquid pearl dots.


Here's hoping you have wonderful weather near you!


Saturday, August 4, 2012

SPS August Blog Hop


Hello everyone! Welcome to the Shop Pumpkin Spice August Blog Hop. We have an amazing new kit to share with  you featuring beautiful papers and a ton of embellishments. Wait 'till you see these goodies.
Please join us in doing the whole SPS Blog Hop by starting at the Pumpkin Spice Blog.

I created this card using most of what you can find in the August Kit.
The August Kit will contain the following supplies:
42 – sheets 6 x 6 (no duplicates) Time for Spring (fancy pants), Everyday Eclectic, Paradise Beach (Echo Park).
6 – Bazzill white base cardstock
12 – A2 White Envelops
1 - Indie Chic wood label
4 – 18” lengths of 4 different Indie Chic Garland
1 – collection of 11 buttons from various Indie Chic collections
3 – Indie Chic Titles
1 – Sheet of Indie Chic Label Stickers
3 – 24” lengths of twine (3 different colors)


Here is the entire blog line up:

SPS Blog - www.pumpkinspiceblog.blogspot.com
Diana - www.dianamlarson.blogspot.com
Courtney - www.courtscrafts.blogspot.com
June - www.simplyelegantpapercrafts.blogspot.com
Lenae - www.sugargemscrafts.blogspot.com
Lezlye - www.lezlyes.blogspot.com
Carissa - www.happilyeverpapercrafter.blogspot.com
Saundra - www.luvscrappingtogether.blogspot.com
SPS Blog - www.pumpkinspiceblog.blogspot.com

So head on over to the wonderfully talented Saundra to see what she's created. Have an amazing rest of your weekend. 

Friday, August 3, 2012

MIM Challenge #76 Take Two

Here is my second card using the same "Double-time Bleach Stamping" technique.


Make It Monday Challenge #76

I created this card using the "Double-Time Bleach Stamping" technique featured on the Papertrey Ink blog. Click here to see this amazing technique.

For some of you stamping with bleach is an old technique, but I had never heard of it or seen it!! So I was a little blown away by the ease of this technique and the results. I played around a lot with my stamps and colors to see which of my PTI supplies would work the best. I made two cards start to finish and here they are.

**Tip : If you do try this technique, here is a tip. Wait at least 1 hour after stamping in the bleach to apply the over stamps. Otherwise they just disappear. I speak from a very frustrated perspective!! Haha**